Introduction to Nitro Enclaves & Secure Computing
First of all, If you would like to know more about nitro enclaves please read my blog post about them here. Nitro enclaves are classed as trusted execution environment (TEEs). I also have a blog post which goes into detail about TEEs and secure computing which you can find here. These articles will provide background context to what I am talking about in this blog post.
Cryptographic attestation
Attestation is a feature available to Nitro Enclaves. The enclave uses the attestation process to prove its identity and build trust with an external service. The attestation process uses a series of measurements that are unique to an enclave. You can use these measurements to create access policies in external services to grant the enclave access to special cryptographic operations.
Attestation implementation overview
To use attestation you need to generate an attestation document. This is then sent as the recipient request parameter to the KMS API allowing for the enclave to attest its identity to the external service which is KMS in this case.
Unfortunately you have to call the KMS API directly and cannot use the AWS SDK (known as boto3 in python land) as there is no intention to expose the recipient field to boto3 according to AWS. Further details on this can be found on the github issue here.
Challenge 1
For Nitro Enclaves attestation, the Enclave needs to generate an RSA key pair and use the public key to generate the attestation document which is then sent to the KMS service.
Generating RSA key pairs requires random number generation, which is usually provided by /dev/random and /dev/urandom. However, in Nitro Enclaves, these are not available.
Solution
We can use /dev/nsm (Nitro Secure Module), which is used for both random number generation and creating attestation documents. Unfortunately, the AWS NSM API only has C interfaces however there is a forked version on GitHub with python interfaces.
Challenge 2
As mentioned earlier boto3 does not support the recipient field meaning attestation does not work when using library's like DynamoDB encryption SDK as this library uses boto3 under the hood to make calls to KMS.
Solution
If you use the item encryptor which the DynamoDB encryption SDK provides. You have to select a materials provider to use. To solve our problem of using not being able to use boto3. I created a attested version of the KMS materials provider. Which works the same as the existing materials provider just changing the calls _generate_initial_material & _decrypt_initial_material make from boto3 to use my KMS service.
KMS / boto3 materials provider
 def _generate_initial_material(self, encryption_context):
        ...
        ...

        response = self._client(key_id).generate_data_key(**kms_params)
        return response["Plaintext"], response["CiphertextBlob"]

        ...
        ...
 def _decrypt_initial_material(self, encryption_context):
        ...
        ...

        response = self._client(key_id).decrypt(**kms_params)
        return response["Plaintext"]

        ...
        ...
KMS / KMS service materials provider
 def _generate_initial_material(self, encryption_context):
        ...
        ...

        response = enclave_attestation_service.kms_generate_data_key(key_id, kms_encryption_context)
        return response["CipherTextForRecipient"], response["CiphertextBlob"]

        ...
        ...
 def _decrypt_initial_material(self, encryption_context):
        ...
        ...

        response = enclave_attestation_service.kms_decrypt(encrypted_initial_material, kms_encryption_context)
        return response

        ...
        ...
The KMS service then makes the attested calls to GenerateDataKey and Decrypt sending the recipient request parameter.
'Recipient': {
                'KeyEncryptionAlgorithm': 'RSAES_OAEP_SHA_256',
                'AttestationDocument': self._get_attestation_doc_b64()
            }
A complete example of what the KMS service should look like can be found here.
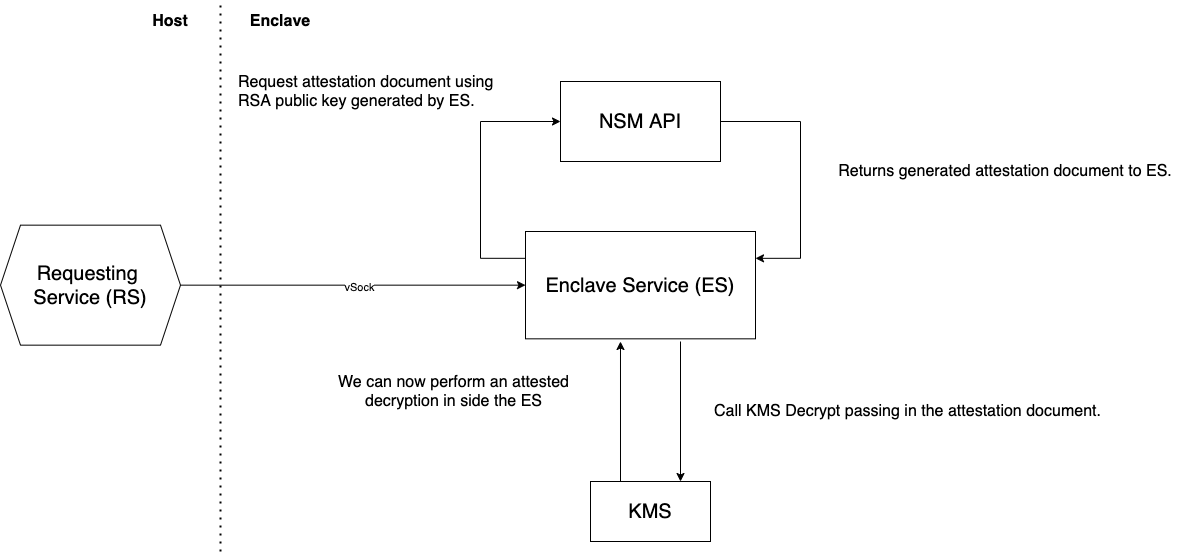
Attested request flow
This is the flow for how the application makes the attested requests.

How the attested encryption works
Generate the attestation document by first generating an RSA key pair inside the enclave. The public key is then used to generate the attestation document. This document is then sent to KMS with the request.
Now we perform an attested KMS GenerateDataKey request this returns the CipherTextForRecipient (This is the data key encrypted with the RSA public key from the attestation document) and the CipherTextBlob.
Decrypt the CipherTextForRecipient using enclave private key. Then encrypt the record using this plain text data key. The CipherTextBlob is stored with the record to allow you to request KMS to decrypt this.
How the attested decrypt works
Request attested decryption of the data key that is stored in the record. This will give you the plain text key re-encrypted with the enclave key.
Now we can decrypt the enclave key encrypted data key with the enclave private key this returns the plain text data key.
Finally decrypt the record with plain text data key. Now you have the plain text record.
You will see encryption takes place twice here.
- KMS key encryption
- Enclave key encryption
This is so we can ensure only the enclave can perform a cryptographic operation.
KMS access policy's
To prepare AWS KMS for attestation you must have the enclave's measurements. These are provided to you when you build a enclave image. When you have the measurements, you can create a KMS key policy that includes condition keys that are based on those measurements.
AWS KMS provides kms:RecipientAttestation:ImageSha384 and kms:RecipientAttestation:PCR condition keys that enable you to create attestation-based condition keys for KMS key policies. These policies ensure that AWS KMS only allows operations using the KMS key if the enclave provides a signed attestation document that contains measurements that match the measurements specified in the KMS key policy's condition keys.

Conclusion
Attestation is a great feature to enable that extra layer of security if you are using TEEs. Similar to AWS; Azure also provides an attestation feature which can be found here.